Post 42 of Series - Install Oracle ZFS on Virtual Box and mount on VMware Machines - Part 1
Remembering the Lord in meditation, you shall find bliss and peace forever deep within, and your mind will become tranquil and cool. It is like the harsh sun of Maya, with its burning heat; seeing the moon, the Guru, its heat totally vanishes. || 1 || O my mind, night and day, meditate, and chant the Lords Name. Here and hereafter, He shall protect you, everywhere; serve such a God forever.
Recently I had an opportunity to work on Oracle ZFS appliance to backup huge database on exadata and then use that backup after taking ZFS snapshots and present to another server and create a snap database to be used for pre-production environment. I was a nice exercise so , I thought to create a simulataed environment on vmware and share here on my blog.
Lets first download the Oracle Virtual Box and also the ZFS simulator software from Oracle website. To download both go th the following url:
You need to install the VBox first in a 64bit OS host.
Just download both softwares from the locations given above, screenshots are provided below.


After download let’s install Virtual box.

Click Run

Next

Next

Next

Next

Install


Install

Finish

Installation is complete now.

Unzip the ZFS simulator software that we downloaded.


Lets import it to the virtual box:

Click choose and go to the unzipped location

Click this file:


Click Import


Import complete

Lets start machine and do the initial network config. Click on Grrrn Arrow to start the machine.


On this screen we need to do the network configuration as follows:
Host Name: OracleZFS
DNS Domain: 192.168.1.254 (Router ip)
IP Address: 192.168.1.195
IP Netmask: 255.255.255.0
Default Router: 192.168.1.254 (Router ip)
DNS Server: 192.168.1.254 (Router ip) Password: gurpartap
Re-enter Password: gurpartap
After this just Press "Esc and "1" together to start install. It takes time so be patient.

After install is complete just shutdown the machine as we need to fix the network card settings to bring it on our network.
Shutdown as follows: Machine -> Close

On this screen pick "Power off the machine"

After machine has halted just click on network and change the settings of the network card to bridged.


Here we go, we are all set. now we need to do some initial setup of the machine, I will use GUI to do that instead of command line.

Open the url https://192.168.1.195:215 in your browser and you will get the following window. If you don't get this window, it means your network settings are not good. Please re-check the network settings and get to this page.
Login as :
Username: root
Password: gurpartap

Click start on the following screen.

You will get to this screen and it starts initial configuration, since it's just a simulator we will keep it simple. So, click commit.

Again click commit:

Again click commit:

Again click commit:

Again click commit:

Click "Later" on the following:

Click "OK" on the following:

and you will get to the following screen:

Now let's configure storage.
Click "Configuration" -> "Storage" and you will get to the following screen

Cick "Available Pools"
Give Pool name as "Pool1"

Allocte 1GB and commit.

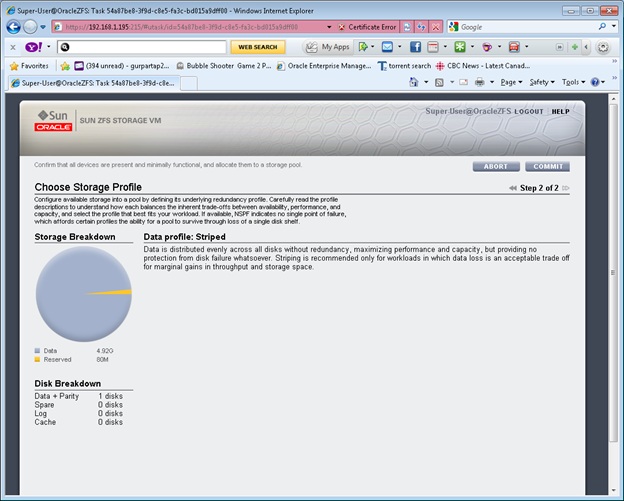
This takes you to Step 2, click commit:

"Pool1" is created now.

Let’s create shares. Now click "Shares"

Click "+" infront of "Filesystems"

Just add name as : "ZFS_DEVICE" and make sure in permissions you click "group" and "others" as well, so that all are yellow and click "APPLY"


Share have been created.

Lets mount it on the database server that we created in Post 1 to 9 as:
Now let's see how it looks on servers and if server can see lets mount it to take backups.
On server as root execute teh following command if the share is visible or not.
showmount -e 192.168.1.195
[root@dgrac02 ~]# showmount -e 192.168.1.195
Export list for 192.168.1.195:
/export/ZFS_DEVICE (everyone)
So its visible.
Let make a directory the we will use to mount this share.
mkdir /zfs1
[root@dgrac02 ~]# mkdir /zfs1
Now, lets mount using following command
mount -o hard,rw,noac,rsize=32768,wsize=32768,suid,proto=tcp,vers=3 192.168.1.195:/export/ZFS_DEVICE /zfs1
[root@dgrac02 ~]# mount -o hard,rw,noac,rsize=32768,wsize=32768,suid,proto=tcp,vers=3 192.168.1.195:/export/ZFS_DEVICE /zfs1
Verify if it mounted or not:
df -h
[root@dgrac02 ~]# df -h
Filesystem Size Used Avail Use% Mounted on
/dev/mapper/VolGroup00-LogVol00
84G 19G 61G 25% /
/dev/sda1 99M 16M 78M 17% /boot
tmpfs 1.3G 165M 1.1G 14% /dev/shm
192.168.1.195:/export/ZFS_DEVICE
9.8G 0 9.8G 0% /zfs1
[root@dgrac02 ~]#
Now take the backup of database on this mount point using rman scrrips given below.
Backup set level 0 backup:
run
{
sql 'alter system set "_backup_disk_bufcnt"=64 scope=memory';
sql 'alter system set "_backup_disk_bufsz"=1048576 scope=memory';
allocate channel ch01 device type disk
format '/zfs/backup/%U';
allocate channel ch02 device type disk
format '/zfs/backup/%U';
backup as compressed backupset incremental level 0 database tag 'FULLBACKUPSET_L0' plus archivelog tag 'FULLBACKUPSET_L0';
}
run
{
sql 'alter system set "_backup_disk_bufcnt"=64 scope=memory';
sql 'alter system set "_backup_disk_bufsz"=1048576 scope=memory';
allocate channel ch01 device type disk
format '/zfs/backup/%U';
allocate channel ch02 device type disk
format '/zfs/backup/%U';
backup as copy database;
}
backup as copy database;
}
So, on one node "dgrac02" we have mounted the zfs mount point. We will take rman backups and take its snaps and present to another server and create test database there. That we will do in subsequent posts.
One who is cursed by the Saints, is thrown down on the ground. The slanderer of the Saints is thrown down from the skies. I hold the Saints close to my soul. The Saints are saved instantaneously. || 1 || He alone is a Saint, who is
pleasing to the Lord. The Saints, and God, have only one job to do. || 1 || Pause || God gives His hand to shelter the Saints. He dwells with His Saints, day and night. With each and every breath, He cherishes His Saints. He takes the power away from the enemies of the Saints. || 2 || Let no one slander the Saints. Whoever slanders them, will be destroyed. One who is protected by the Creator Lord, cannot be harmed, no matter how much the whole world may try. || 3 || I place my faith in my God. My soul and body all belong to Him. This is the faith which inspires Nanak: the self-willed manmukhs will fail, while the Gurmukhs will always win. || 4 || 16 || 18 ||
pleasing to the Lord. The Saints, and God, have only one job to do. || 1 || Pause || God gives His hand to shelter the Saints. He dwells with His Saints, day and night. With each and every breath, He cherishes His Saints. He takes the power away from the enemies of the Saints. || 2 || Let no one slander the Saints. Whoever slanders them, will be destroyed. One who is protected by the Creator Lord, cannot be harmed, no matter how much the whole world may try. || 3 || I place my faith in my God. My soul and body all belong to Him. This is the faith which inspires Nanak: the self-willed manmukhs will fail, while the Gurmukhs will always win. || 4 || 16 || 18 ||
Hi
ReplyDeleteIs it possible to create a Clustered configuration of ZFS storage using a simulator ?
that would be nice
Thanks
Waseem.
Yes it works. I created the diskgroups and mounted on machines nad then created a 2 node RAC database. If this is what cluster you are referring to, it works :)
DeleteI have not tried it but it should work.
ReplyDelete