He has no fear and He is not afraid of anyhthing
Index of all the posts of Gurpartap Singh's Blog
Now we are going to create the Base machine for RAC and I will name it base_rac.
Copy the base machine folder and rename the new folder as "rac_base"
Now open pen the new machine as shown below with Vmware Workstation
OR
Hit Ctrl+O (to open machine) and browse to the new base RAC directory and open the vmware config file in our case is CentOS_5_RAC.

Add 3 more host-only network cards to this machine as shown below, after doing this process for 3 times you will havein total 1 bridged card and 3 host-only cards:

click host-only

Then click options and name this machine as "base_rac" as shown below.

and then start the machine.

Once its up check its eth0 ip to connect from putty. In this case mine is 192.168.1.107

Login through putty and run following command as root:
system-config-network
and you come to the following screen. Here we will edit devices.

Update eth0

Uncheck Use dhcp
Static IP : 192.168.1.176
Netmask : 255.255.255.0
Default Gateway IP : 192.168.1.1

and then pick eth1:
Uncheck DHCP
Make static ip 10.10.1.176
Netmask 255.255.255.0


Then edit eth2 as:
Uncheck Use DHCP
Static IP 10.10.2.100
Netmask 255.255.255.0
Nothing for default gateway
Now for eth3 and eht4 as you did for eth1 but the static ips will be:
10.10.3.176 and 10.10.4.176


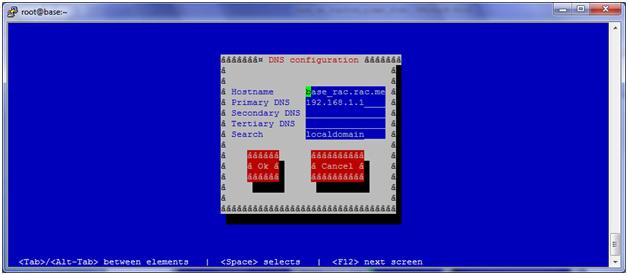
Now we will edit the dns configuration.

Change the name to base_rac.rac.meditate.com
and
primary DNS to 192.168.1.1 and click ok.
Now restart the network from the machine itself, as root run:
service network restart
It wil restart the full network and new ips will now be in effect.
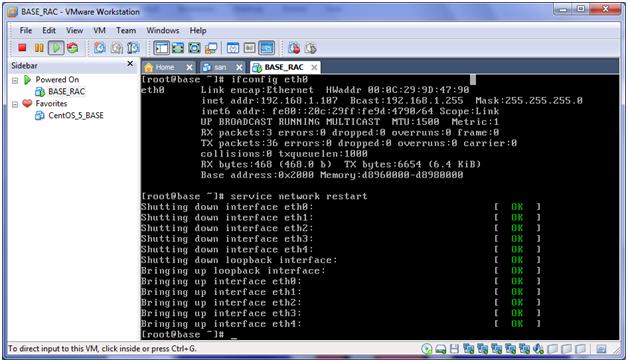
Now connect to the machine through putty as root and run "ifconfig" and you will see the following output.
[root@ base_rac ~]# ifconfig
eth0 Link encap:Ethernet HWaddr 00:0C:29:9D:47:90
inet addr:192.168.1.176 Bcast:192.168.1.255 Mask:255.255.255.0
inet6 addr: fe80::20c:29ff:fe9d:4790/64 Scope:Link
UP BROADCAST RUNNING MULTICAST MTU:1500 Metric:1
RX packets:724 errors:0 dropped:0 overruns:0 frame:0
TX packets:547 errors:0 dropped:0 overruns:0 carrier:0
collisions:0 txqueuelen:1000
RX bytes:64021 (62.5 KiB) TX bytes:143868 (140.4 KiB)
Base address:0x2000 Memory:d8960000-d8980000
eth1 Link encap:Ethernet HWaddr 00:0C:29:9D:47:9A
inet addr:10.10.1.176 Bcast:10.10.1.255 Mask:255.255.255.0
inet6 addr: fe80::20c:29ff:fe9d:479a/64 Scope:Link
UP BROADCAST RUNNING MULTICAST MTU:1500 Metric:1
RX packets:169 errors:0 dropped:0 overruns:0 frame:0
TX packets:80 errors:0 dropped:0 overruns:0 carrier:0
collisions:0 txqueuelen:1000
RX bytes:41613 (40.6 KiB) TX bytes:15853 (15.4 KiB)
Base address:0x2080 Memory:d8980000-d89a0000
eth2 Link encap:Ethernet HWaddr 00:0C:29:9D:47:A4
inet addr:10.10.2.100 Bcast:10.10.2.255 Mask:255.255.255.0
inet6 addr: fe80::20c:29ff:fe9d:47a4/64 Scope:Link
UP BROADCAST RUNNING MULTICAST MTU:1500 Metric:1
RX packets:149 errors:0 dropped:0 overruns:0 frame:0
TX packets:74 errors:0 dropped:0 overruns:0 carrier:0
collisions:0 txqueuelen:1000
RX bytes:35176 (34.3 KiB) TX bytes:15359 (14.9 KiB)
Base address:0x20c0 Memory:d89a0000-d89c0000
eth3 Link encap:Ethernet HWaddr 00:0C:29:9D:47:AE
inet addr:10.10.3.176 Bcast:10.10.3.255 Mask:255.255.255.0
inet6 addr: fe80::20c:29ff:fe9d:47ae/64 Scope:Link
UP BROADCAST RUNNING MULTICAST MTU:1500 Metric:1
RX packets:131 errors:0 dropped:0 overruns:0 frame:0
TX packets:72 errors:0 dropped:0 overruns:0 carrier:0
collisions:0 txqueuelen:1000
RX bytes:29702 (29.0 KiB) TX bytes:14730 (14.3 KiB)
Base address:0x2400 Memory:d89c0000-d89e0000
eth4 Link encap:Ethernet HWaddr 00:0C:29:9D:47:B8
inet addr:10.10.4.176 Bcast:10.10.4.255 Mask:255.255.255.0
inet6 addr: fe80::20c:29ff:fe9d:47b8/64 Scope:Link
UP BROADCAST RUNNING MULTICAST MTU:1500 Metric:1
RX packets:100 errors:0 dropped:0 overruns:0 frame:0
TX packets:75 errors:0 dropped:0 overruns:0 carrier:0
collisions:0 txqueuelen:1000
RX bytes:21525 (21.0 KiB) TX bytes:15022 (14.6 KiB)
Base address:0x2440 Memory:d89e0000-d8a00000
lo Link encap:Local Loopback
inet addr:127.0.0.1 Mask:255.0.0.0
inet6 addr: ::1/128 Scope:Host
UP LOOPBACK RUNNING MTU:16436 Metric:1
RX packets:8 errors:0 dropped:0 overruns:0 frame:0
TX packets:8 errors:0 dropped:0 overruns:0 carrier:0
collisions:0 txqueuelen:0
RX bytes:560 (560.0 b) TX bytes:560 (560.0 b)
[root@ base_rac ~]#
Now check the hostname and it would also have been updated by now.
[root@ base_rac ~]# hostname
base_rac.rac.meditate.com
Try to ping oracle's website to make sure the internet is working on the machine as follows:
[root@base_rac ~]# ping www.oracle.com
PING a398.g.akamai.net (206.108.207.146) 56(84) bytes of data.
64 bytes from 206.108.207.146: icmp_seq=1 ttl=61 time=17.1 ms
64 bytes from 206.108.207.146: icmp_seq=2 ttl=61 time=16.6 ms
64 bytes from 206.108.207.146: icmp_seq=3 ttl=61 time=16.7 ms
--- a398.g.akamai.net ping statistics ---
3 packets transmitted, 3 received, 0% packet loss, time 11017ms
rtt min/avg/max/mdev = 16.698/16.842/17.128/0.251 ms
[root@base_rac ~]#
Since ping is returning it means we are connected to the internet with this machine.
Now make your /etc/hosts look like following:
# Do not remove the following line, or various programs
# that require network functionality will fail.
127.0.0.1 base.rac.meditate.com base localhost.localdomain localhost
::1 localhost6.localdomain6 localhost6
# iSCSI SAN Server
10.10.1.175 san.rac.meditate.com san
# SCAN IP and Name
10.10.2.166 scan.rac.meditate.com
# This node primary address
192.168.1.176 rac1.rac.meditate.com rac1
# This node SAN address
10.10.1.176 rac1-san.rac.meditate.com rac1-san
# This node private interconnect address
10.10.3.176 rac1-priv.rac.meditate.com rac1-priv
# This node VIP address
10.10.2.176 rac1-vip.rac.meditate.com rac1-vip
# Repeat for each node in cluster
192.168.1.177 rac2.rac.meditate.com rac2
10.10.1.177 rac2-san.rac.meditate.com rac2-san
10.10.3.177 rac2-priv.rac.meditate.com rac2-priv
10.10.2.177 rac2-vip.rac.meditate.com rac2-vip
# Repeat for each node in cluster
192.168.1.178 rac3.rac.meditate.com rac3
10.10.1.178 rac3-san.rac.meditate.com rac3-san
10.10.3.178 rac3-priv.rac.meditate.com rac3-priv
10.10.2.178 rac3-vip.rac.meditate.com rac3-vip
Next Install the package dependencies for Oracle (answer ‘y’ when prompted), I would use yum to install the packages as:
yum install iscsi-initiator-utils \
gcc.x86_64 \
gcc-c++.x86_64 \
xorg-x11-utils.x86_64 \
xorg-x11-xinit.x86_64 \
unixODBC-devel.x86_64 \
unixODBC.i386 \
unixODBC-devel.i386 \
sysstat.x86_64 \
libstdc++.so.5 \
compat-libstdc++-33-3.2.3-61.x86_64 \
compat-db-4.2.52-5.1.x86_64 \
libaio-devel.x86_64 \
libaio-devel.i386 \
libXp.x86_64 \
libXp-devel.x86_64 \
libXpm-devel.x86_64 \
libXp.i386 \
gdb.x86_64 \
elfutils-libelf-devel.x86_64 \
compat-gcc-34.x86_64 \
compat-gcc-34-c++.x86_64 \
libgnome.x86_64 \
libc-client.x86_64 \
libc-client-devel.x86_64 \
glibc.x86_64 \
libXtst-devel.x86_64 \
libXtst.i386 \
glibc-devel.i386 \
glibc-devel.x86_64 \
pdksh.x86_64
After the above command downloads and installs the everything successfully do the following:
Download a file from the following link
http://oss.oracle.com/el5/oracle-validated/oracle-validated-1.0.0-18.el5.x86_64.rpm
Copy over the downloaded Oracle-Validated RPM to the VM with Winscp.
(I hope everybody knows how to use Winscp). Though we can share the windows directories with this machine and no need to copy with Winscp but I am not using it for now.
From putty cd to the directory where you copied this file and run the following command to install the package:
rpm -Uhv oracle-validated-1.0.0-18.el5.x86_64.rpm
This package creates the oracle id and groups and sets kernel parameters. Remeber the default password of user oracle is same as username i.e. "oracle" and I am not going to change it in this article. This is much faster and reduces the chances of errors than doing it all manually. Though it should set all the kernel parameter necessary for Grid and Oracle but , it doesn't set these three parameter. So to set them manually and so that these parameters are ok in the next reboot edit as root the /etc/sysctl.conf file and update the following values for the following 3 parameters :
fs.file-max = 6815744
net.ipv4.ip_local_port_range = 9000 65500
net.core.wmem_max= 1048576
At this point make sure san machine is running and if not then start it up.
Now start the iscsi servvice on the machine by executing the following command as root:
service iscsi start
service iscsi start
Now discover the luns with the following command:
iscsiadm -m discovery -t sendtargets -p san.rac.meditate.com
and you should see:
10.10.1.175:3260,1 iqm.mgmt.volumes-san
You should also be able to see the devices using
"fdisk -l" and
ls -l /dev/sd*
Note - sdb to sdm are the iscsi disks and if you don't see them reboot the machine and try discovery again and you should be able to see these luns.
Execute following as root so that iscsi service starts on every reboot.
chkconfig --level 345 iscsi on
With the following command change the permissions of the devices to oracle and oinstall:
Though we have more devices but we have activated just 12 of them in SAN, if you want you can add them now or you can add them later. I will not add them now.
chown oracle:oinstall /dev/sd[b-m]
Also add this line to the end of the file /etc/rc.d/rc.local
chown oracle:oinstall /dev/sd[b-m]
Make the following directories on the machine and then change their ownership to oracle.
mkdir /u01 /u02 /software
chown oracle:oinstall /u01 /u02 /software
Now tweak the machine so that installer thinks that its Redhat and not CentOS as installer fails otherwise.
echo "redhat-release-5Server-5" > /tmp/.linux_release
/usr/bin/chattr +i /tmp/.linux_release
Install X windows software Xming. Its free to download and use and start it.
http://sourceforge.net/projects/xming/
Now, open the new putty window and click on SSH under connection and clcik X11 and then check Enable X11 forwarding. The screen shot of this putty step has been covered in step 5
Now login as root to this machine from this window and do the following.
Now, install the vmware tools,click VM->Install VMware Tools

Now on putty window that we opened in the above step mount the cdrom as:
First create the cdrom directory with the following command:
mkdir /cdrom
Then mount it with teh following directory:
mount -t iso9660 -o ro /dev/cdrom /cdrom
Now shift to cdrom directory
cd /cdrom
and list the files in it:
[root@base_rac cdrom]# ls -lart
total 93674
-r--r--r-- 1 root root 1864 Oct 22 2009 manifest.txt
-r--r--r-- 1 root root 95909121 Oct 22 2009 VMwareTools-8.1.3-203739.tar.gz
dr-xr-xr-x 2 root root 2048 Oct 22 2009 .
drwxr-xr-x 28 root root 4096 Jun 29 22:51 ..
[root@base_rac cdrom]#
[root@base_rac cdrom]# ls -lart
total 93674
-r--r--r-- 1 root root 1864 Oct 22 2009 manifest.txt
-r--r--r-- 1 root root 95909121 Oct 22 2009 VMwareTools-8.1.3-203739.tar.gz
dr-xr-xr-x 2 root root 2048 Oct 22 2009 .
drwxr-xr-x 28 root root 4096 Jun 29 22:51 ..
[root@base_rac cdrom]#
So we have VMwareTools-8.1.3-203739.tar.gz, we will untar it to install VMware tools as follows:
shift to /tmp directory as:
cd /tmp
Unzip it as:
gunzip -c /cdrom/VMwareTools-8.1.3-203739.tar.gz tar xf -
gunzip -c /cdrom/VMwareTools-8.1.3-203739.tar.gz tar xf -
and now list the contents as:
[root@base_rac tmp]# ls -lart
total 28
drwxr-xr-x 7 root root 4096 Oct 22 2009 vmware-tools-distrib
-rw-r--r-- 1 root root 25 Jun 29 22:11 .linux_release
drwxrwxrwt 2 root root 4096 Jun 29 22:44 .ICE-unix
drwxr-xr-x 28 root root 4096 Jun 29 22:51 ..
drwxrwxrwt 4 root root 4096 Jun 29 22:57 .
Now shift to the following directory:
[root@base_rac tmp]#
cd /tmp/vmware-tools-distrib
cd /tmp/vmware-tools-distrib
At this point we are all set to run the install of the VMware tools. Just execute the following file and it will install the VMWare tools as follows, remeber to hit enter at all the questions i.e. accept the default answers and you will have the following output:
[root@base_rac vmware-tools-distrib]# ./vmware-install.pl
Creating a new VMware Tools installer database using the tar4 format.
Installing VMware Tools.
In which directory do you want to install the binary files?
[/usr/bin]
What is the directory that contains the init directories (rc0.d/ to rc6.d/)?
[/etc/rc.d]
What is the directory that contains the init scripts?
[/etc/rc.d/init.d]
In which directory do you want to install the daemon files?
[/usr/sbin]
In which directory do you want to install the library files?
[/usr/lib/vmware-tools]
The path "/usr/lib/vmware-tools" does not exist currently. This program is
going to create it, including needed parent directories. Is this what you want?
[yes]
In which directory do you want to install the documentation files?
[/usr/share/doc/vmware-tools]
The path "/usr/share/doc/vmware-tools" does not exist currently. This program
is going to create it, including needed parent directories. Is this what you
want? [yes]
The installation of VMware Tools 8.1.3 build-203739 for Linux completed
successfully. You can decide to remove this software from your system at any
time by invoking the following command: "/usr/bin/vmware-uninstall-tools.pl".
Before running VMware Tools for the first time, you need to configure it by
invoking the following command: "/usr/bin/vmware-config-tools.pl". Do you want
this program to invoke the command for you now? [yes]
Stopping VMware Tools services in the virtual machine:
Guest operating system daemon: [ OK ]
Virtual Printing daemon: [ OK ]
Unmounting HGFS shares: [ OK ]
Guest filesystem driver: [ OK ]
Found a compatible pre-built module for vmmemctl. Installing it...
Found a compatible pre-built module for vmhgfs. Installing it...
Found a compatible pre-built module for vmxnet. Installing it...
Found a compatible pre-built module for vmblock. Installing it...
[EXPERIMENTAL] The VMware FileSystem Sync Driver (vmsync) is a new feature that
creates backups of virtual machines. Please refer to the VMware Knowledge Base
for more details on this capability. Do you wish to enable this feature?
[no]
Found a compatible pre-built module for vmci. Installing it...
Found a compatible pre-built module for vsock. Installing it...
Found a compatible pre-built module for vmxnet3. Installing it...
Found a compatible pre-built module for pvscsi. Installing it...
No X install found.
Creating a new initrd boot image for the kernel.
Checking acpi hot plug [ OK ]
Starting VMware Tools services in the virtual machine:
Switching to guest configuration: [ OK ]
Paravirtual SCSI module: [ OK ]
Guest filesystem driver: [ OK ]
Mounting HGFS shares: [FAILED]
Guest memory manager: [ OK ]
VM communication interface: [ OK ]
VM communication interface socket family: [ OK ]
Blocking file system: [ OK ]
File system sync driver: [ OK ]
Guest operating system daemon: [ OK ]
Virtual Printing daemon: [ OK ]
The configuration of VMware Tools 8.1.3 build-203739 for Linux for this running
kernel completed successfully.
You must restart your X session before any mouse or graphics changes take
effect.
You can now run VMware Tools by invoking the following command:
"/usr/bin/vmware-toolbox" during an X server session.
To enable advanced X features (e.g., guest resolution fit, drag and drop, and
file and text copy/paste), you will need to do one (or more) of the following:
1. Manually start /usr/bin/vmware-user
2. Log out and log back into your desktop session; and,
3. Restart your X session.
Enjoy,
--the VMware team
Found VMware Tools CDROM mounted at /cdrom. Ejecting device /dev/cdrom ...
[root@base_rac vmware-tools-distrib]#
Now start Xming if you have not started earlier and execute the following command:
/usr/bin/vmware-toolbox
Xming will open the following window and you can check the checkbox for time synchronization and then click close. Thats it and now we are done with installing VMware tools.

We are done with BASE_RAC machine, just shut it down with the following command:
Shut down the Base RAC VM using “init 0” .
Create 2 VM nodes for the RAC cluster by making 2 copies of Base RAC vm. If you have just 4GB ram don't try for third node. If you have 6GB or 8GB then make 3rd copy of Base RAC vm and name it rac3
Create 2 VM nodes for the RAC cluster by making 2 copies of Base RAC vm. If you have just 4GB ram don't try for third node. If you have 6GB or 8GB then make 3rd copy of Base RAC vm and name it rac3
I will not install Grid Infrastructure on this third node i.e. rac3 but will use this to show you, how to add a new node to the existing 2 node cluster and how to add a new instance to an existing RAC database in Part 8 .
Now open all these 3 VMs and rename them. We have done renaming earlier also so I am not doing the screenshots here. Just click edit virtual machine and then click options and rename the machine to rac1 i.e. replace base_rac with rac1 and in the same way rename other two copies as rac2 and rac3.
Now start rac1 and it will not use static ip and will usse dhcp. You when you copy machines then at first reboot the machine uses dhcp. Just fix it. You have to do this just once and then at subsequent reboot it will pick static ip.
So login as root on the console and execute "ifconfig eth0" to see the ip the machine is using. In my case it was 192.168.1.106
Just logon through putty to this machine with this ip address and run :
system-config-network
and update eth0 to use static ip 192.168.1.176,netmask 255.255.255.0 and gateway 192.168.1.1
and uncheck dhcp and
update eth1 to static ip of 10.10.1.176 and netmask of 255.255.255.0 and nothing gateway and uncheck dhcp and
update eth2 to static ip of 10.10.2.100 and netmask of 255.255.255.0 and nothing gateway and uncheck dhcp and
update eth3 to static ip of 10.10.3.176 and netmask of 255.255.255.0 and nothing for gateway and uncheck dhcp and
update eth4 to static ip of 10.10.4.176 and netmask of 255.255.255.0 and nothing for gateway and uncheck dhcp.
Now edit the DNS configuration:
rename to "rac1.rac.meditate.com"
and update primary dns to 192.168.1.1
and update primary dns to 192.168.1.1
Now start rac2 and it will not use static ip and will use dhcp.
So login as root on the console and execute "ifconfig eth0" to see the ip the machine is using. In mycase it was 192.168.1.107
Just logon through putty to this machine with this ip address and run :
system-config-network
and update eth0 to use static ip 192.168.1.177,netmask 255.255.255.0 and gateway 192.168.1.1
and uncheck dhcp and
update eth1 to static ip of 10.10.1.177 and netmask of 255.255.255.0 and nothing gateway and uncheck dhcp and
update eth2 to static ip of 10.10.2.101 and netmask of 255.255.255.0 and nothing gateway and uncheck dhcp and
update eth3 to static ip of 10.10.3.177 and netmask of 255.255.255.0 and nothing for gateway and uncheck dhcp and
update eth4 to static ip of 10.10.4.177 and netmask of 255.255.255.0 and nothing for gateway and uncheck dhcp.
Now edit the DNS configuration, change name to rac2.rac.meditate.com and
update the primary DNS to 192.168.1.1
Now if you are using rac3 then start it and it will also not use static ip and will use dhcp.
Now if you are using rac3 then start it and it will also not use static ip and will use dhcp.
So login as root on the console and execute "ifconfig eth0" to see the ip the machine is using. In mycase it was 192.168.1.108
Just logon through putty to this machine with this ip address and run :
system-config-network
and update eth0 to use static ip 192.168.1.178,netmask 255.255.255.0 and gateway 192.168.1.1
and uncheck dhcp and
update eth1 to static ip of 10.10.1.178 and netmask of 255.255.255.0 and nothing gateway and uncheck dhcp and
update eth2 to static ip of 10.10.2.102 and netmask of 255.255.255.0 and nothing gateway and uncheck dhcp and
update eth3 to static ip of 10.10.3.178 and netmask of 255.255.255.0 and nothing for gateway and uncheck dhcp and
update eth4 to static ip of 10.10.4.178 and netmask of 255.255.255.0 and nothing for gateway and uncheck dhcp.
Now update the DNS configuration and rename the machine to rac3.rac.meditate.com and
Now update the DNS configuration and rename the machine to rac3.rac.meditate.com and
update the Primary DNS to 192.168.1.1
Now reboot all the nodes and check that they have the same ips as we have just set and also they can ping "ww.oracle.com" and you can see the luns from these machines by running
"ls -l /dev/sd*"
You should see few luns owned by oracle:oinstall to make sure that the machines can see the luns.
Now shutdown all the machines as we are ready to install grid infrastructure.
After you shoutdown all the machines just take the backup of all the machnes by copying them as in the next part we are going to install the Grid Infrastructure.
Remember:
Feel Him in and around you all the time as He is everywhere.
Part 1 - Vmware Setup
Part 2 - Setup Base Brick Machine
Part 3 - SAN Setup
Part 4 - RAC VM Setup
Part 5 - Install Grid Infrastructure
Part 6 - Run asmca and Install RDBMS Software
Part 7 - Create RAC database with DBCA
Part 8 - Add node and instance to existing 11gR2 Cluster db
Part 9 - Delete node and inst from exisiting 11gR2 cluster db
hello,
ReplyDeletei was unable to see tthe san lun from base rac.
it was unable to ping privaate ip.
thanks
syed
# SCAN IP and Name
10.10.2.166 scan.rac.meditate.com
[root@base_rac software]# ping 10.10.1.175
PING 10.10.1.175 (10.10.1.175) 56(84) bytes of data.
From 10.10.1.176 icmp_seq=2 Destination Host Unreachable
From 10.10.1.176 icmp_seq=3 Destination Host Unreachable
PING 192.168.1.174 (192.168.1.174) 56(84) bytes of data.
64 bytes from 192.168.1.174: icmp_seq=1 ttl=64 time=3.01 ms
64 bytes from 192.168.1.174: icmp_seq=2 ttl=64 time=0.313 ms
[root@base_rac software]# service iscsi start
iscsid is stopped
Starting iSCSI daemon: [ OK ]
[ OK ]
Setting up iSCSI targets: iscsiadm: No records found!
[ OK ]
[root@base_rac software]# iscsiadm -m discovery -t sendtargets -p san.rac.meditate.com
# that require network functionality will fail.
[root@san ~]# ifconfig
eth0 Link encap:Ethernet HWaddr 00:0C:29:12:58:11
inet addr:192.168.1.175 Bcast:192.168.1.255 Mask:255.255.255.0
inet6 addr: fe80::20c:29ff:fe12:5811/64 Scope:Link
UP BROADCAST RUNNING MULTICAST MTU:1500 Metric:1
RX packets:30959 errors:0 dropped:0 overruns:0 frame:0
TX packets:1153 errors:0 dropped:0 overruns:0 carrier:0
collisions:0 txqueuelen:1000
RX bytes:2026129 (1.9 MiB) TX bytes:93697 (91.5 KiB)
eth1 Link encap:Ethernet HWaddr 00:0C:29:12:58:1B
inet addr:10.10.1.175 Bcast:10.10.1.255 Mask:255.255.255.0
inet6 addr: fe80::20c:29ff:fe12:581b/64 Scope:Link
UP BROADCAST RUNNING MULTICAST MTU:1500 Metric:1
RX packets:30428 errors:0 dropped:0 overruns:0 frame:0
TX packets:414 errors:0 dropped:0 overruns:0 carrier:0
collisions:0 txqueuelen:1000
RX bytes:1897833 (1.8 MiB) TX bytes:27387 (26.7 KiB)
lo Link encap:Local Loopback
inet addr:127.0.0.1 Mask:255.0.0.0
inet6 addr: ::1/128 Scope:Host
UP LOOPBACK RUNNING MTU:16436 Metric:1
RX packets:1341 errors:0 dropped:0 overruns:0 frame:0
TX packets:1341 errors:0 dropped:0 overruns:0 carrier:0
collisions:0 txqueuelen:0
RX bytes:4590900 (4.3 MiB) TX bytes:4590900 (4.3 MiB)
Hello Syed,
ReplyDelete1. I hope you have done the exact steps as in note 1 for vmware workstation settings. You can always double check.
http://gurpartapblog.blogspot.com/2010/06/install-oracle-rac-11gr2-on-vmware-on.html
2. If not do it and try again. If yes, looks like while renaming your machine you have not updated
the ips/hostname properly. i.e. execute as root "system-config-network" and check all the ips of the machine and
please double check "edit dns configuration" and make sure it looks like:
http://1.bp.blogspot.com/_KUieRnQi854/TCvG8IB7jgI/AAAAAAAAAKE/DH5rw-1SUcA/s1600/pic_24.JPG
i.e. double check your Primary DNS and hostname. Hope this Helps.
Hi Gurpartap,
ReplyDeleteI have Copied the base rac vm machine folder and renamed the new folders as "rac2" and "rac3". After that I have renamed the machine to rac1 (base_rac -> rac1) and same way renames other two copies as rac2 and rac3.
I was unable to see the san lun from base rac and also unable to ping san ip (10.10.1.175 san.rac.meditate.com san)
Here is the output..
[root@base_rac ~]# ls -l /dev/sd*
brw-r----- 1 root disk 8, 0 Feb 24 16:24 /dev/sda
brw-r----- 1 root disk 8, 1 Feb 24 21:24 /dev/sda1
brw-r----- 1 root disk 8, 2 Feb 24 16:24 /dev/sda2
[root@base_rac ~]#
[root@base_rac ~]# ping 10.10.1.175
PING 10.10.1.175 (10.10.1.175) 56(84) bytes of data.
From 10.10.1.176 icmp_seq=1 Destination Host Unreachable
From 10.10.1.176 icmp_seq=2 Destination Host Unreachable
From 10.10.1.176 icmp_seq=3 Destination Host Unreachable
Please advise..do i need to start SAN vm machine along with rac1,rac2,rac3..
Thanks..
Deb
Hi
ReplyDeleteIscsi error..
[root@base_rac ~]# service iscsi start
iscsid (pid 3050) is running...
Setting up iSCSI targets: Logging in to [iface: default, target: iqm.mgmt.volumes-san, portal: 10.10.1.175,3260]
iscsiadm: Could not login to [iface: default, target: iqm.mgmt.volumes-san, portal: 10.10.1.175,3260]:
iscsiadm: initiator reported error (8 - connection timed out)
iscsiadm: Could not log into all portals. Err 8.
[ OK ]
[root@base_rac ~]#
Thanks
Deb
Hi Deb,
ReplyDeleteReply to your question :
"do i need to start SAN vm machine along with rac1,rac2,rac3"
Yes, we need to run the san machine along with rac1,rac2 and rac3. You must be able to ping it before able to use its luns.
I hope that will fix the problems that you are facing.
Regards
Gurpartap Singh
Hi Deb,
ReplyDeleteAlso forgot to mention that you need to follow all the steps that I have listed to rename the machine.
Good Luck and have Fun !
Regards
Gurpartap Singh
Hello,
ReplyDeleteI followed your instructions step by step and I stop on Part 4 where I have to execute the command. "iscsiadm -m discovery -t sendtargets -p san.rac.meditate.com " Even though my base_rac eth1 IP address is 10.10.1.176 and my San eth1 IP address is 10.10.1.175 I can not ping each other and got the following error for the above command. CANNOT MAKE CONNECTION TO 10.10.1.176:3260 (111) CONNECTION TO DISCOVERY ADDRESS 10.10.1.176 FAILED
What is the SAN server /etc/hosts file look like?
ReplyDeletePlease disregard both my request. I found the error.
ReplyDeleteHi Gurpartap,
ReplyDeleteHey I am following the same steps as you mentioned in the article..i am getting following errors
This is from RAC1
[root@rac1 ~]# iscsiadm -m discovery -t sendtargets -p san1
iscsiadm: cannot make connection to 10.10.1.175: No route to host
iscsiadm: cannot make connection to 10.10.1.175: No route to host
iscsiadm: cannot make connection to 10.10.1.175: No route to host
I tried the same steps repeated couple of time not able to find the problem.. Could you please guide me.
Kc
Hello Chakravarthy,
ReplyDeletePlease make sure machine "SAN" is up and running and also make sure you can oing it from rac1 and other machines.
Check your /etc/hosts and make sure the following line is there (both in san as well as rac1) and also make sure the ip's and names of teh machines in this file are properly defined.
127.0.0.1 base.rac.meditate.com base localhost.localdomain localhost
Good Luck !
Regards
Gurpartap Singh
Please Ignore earlier post of mine.. Works perfect.
ReplyDeleteThis comment has been removed by the author.
DeleteHi Chakravarthy,
ReplyDeleteGood to know that its working for you and thanks for letting me know.
You have a nice name, I use this name for God many times.
Regards
Gurpartap Singh
Mr.Singh,
ReplyDeleteCentos is giving me lot's of problem while performing this lab. Can i use redhat 5 for same lab? thanks!
regards,
Sorry for a delayed reply Parvez and thanks for visting this blog.
ReplyDeleteCentos is a clone of RHEl, so I think you will have same problem on RHEL as well.
Can you share the problem you are having?
Regards
Gurpartap Singh
Hello Gurpartap Singh Ji,
ReplyDeleteI downloaded file to create user and groups and ran from base_rac and got the following error. Can you help me with this.
warning: oracle-validated-1.0.0-18.el5.x86_64.rpm: Header V3 DSA signature: NOKEY, key ID 1e5e0159
error: Failed dependencies:
/usr/lib/libICE.so.6 is needed by oracle-validated-1.0.0-18.el5.x86_64
/usr/lib/libSM.so.6 is needed by oracle-validated-1.0.0-18.el5.x86_64
/usr/lib/libXt.so.6 is needed by oracle-validated-1.0.0-18.el5.x86_64
Hi Talwinder,
ReplyDeleteLooks like you missed something in yum command. Connect you machine to internet as shown in blog and execute yum command to download and install required packages.
Regards,
Gurpartap Singh
Hi Gurpartal,
ReplyDeleteI am facing the problem when ran the file http://oss.oracle.com/el5/oracle-validated/oracle-validated-1.0.0-18.el5.x86_64.rpm. It shows me log of depencies error.
Please let us know, how to resolve this.
Thanks
Deepak
Do i use these same ip addresses in my network? I am asking because my vm network editor is showing different addresses.
ReplyDelete