He has no Hatred and no enmity
Index of all the posts of Gurpartap Singh's Blog
Finally we are ready to install Grid Infrastructure. Copy the software (one zipped file of grid and two zipped files for database) you downloaded from oracle to rac1 under /software directory using Winscp or anyother method and do this as user oracle. I did it using Winscp.

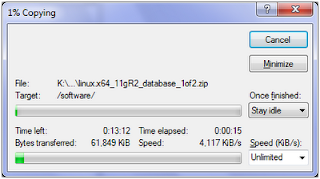
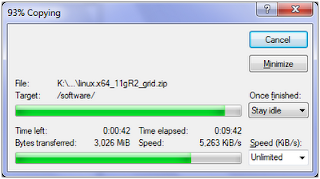
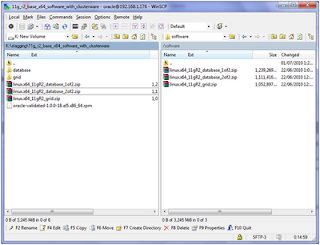
Now login to rac1 as oracle from putty and unzip the grid file as, following are the screenshots that show you how to open a putty window that has X11 forward enabled. I had explained it in the last part also but here I am explaining agin with screen shots.
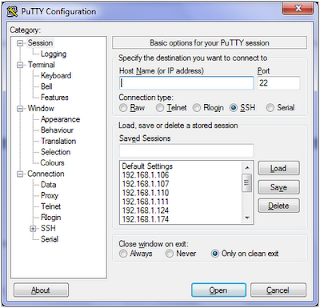
Open the putty window and click on ssh under connection and click X11 and then check enable X11 forwarding and login. I am logging in as oracle as we will install Grid infrastructure now.
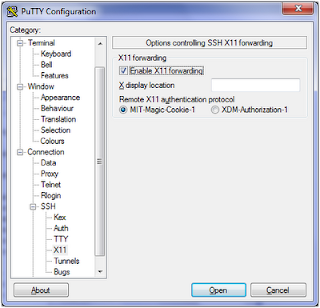
Now logon to machine rac1 from this putty window and unzip the grid software file as following:
cd /software
unzip linux.x64_11gR2_grid.zip
Once unzip completes you can remove the zipped file of grid to save space.
rm linux.x64_11gR2_grid.zip
At this point start Xming if you have not started by now and run installer as follows.
Now we will run installer as:
cd /software/grid
./runInstaller
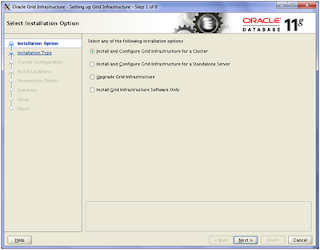
and you will see the following screen:

Click next make sure "Install and configure Grid infrastructure for a cluster" is already checked.
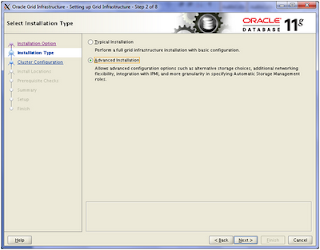
I will do a default install so click "Advanced Installation" and next
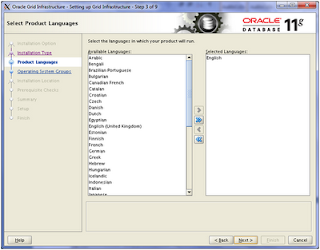
Here select language and I will select English and next.
Here keep cluster name default and make scan name "scan.rac.meditate.com" and uncheck GNS as will not be using GNS and click next.
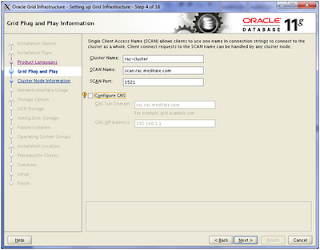
Here installer will pick the hostname and vip and will do its best guess but you need to make sure that the installer is picking right values. If not fix them, I had following:
rac1.rac.meditate.com and rac1-vip.rac.meditate.com so nothing to change. Now I will add second node here, I will not add third node as it will not work on 4GB ram also I want to show how to add node to existing 2 node rac later. So, I am saving machine rac3 for now. But if you want to install on 3 nodes add other 2 nodes here and it would work but remember you need at least 6GB ram for that.
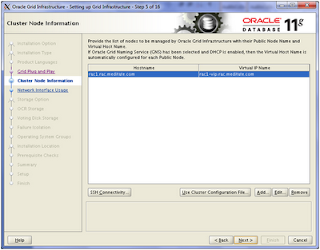
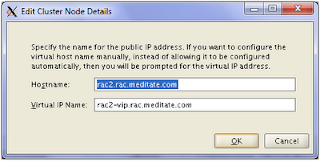
So click add and on the following screen add the second node as:
rac2.rac.meditate.com and rac2-vip.rac.meditate.com
and click OK. and then click next.
Now select both the nodes and click SSH connectivity and enter the password of oracle user , in our case its (oracle) and click setup.
This is a nice new install feature that takes the guesswork of setting up ssh connectivity between the nodes. Note, that if you made a typo in the /etc/hosts file the installer might fail to set up the ssh connectivity. Though Oracle RAC is getting heavier on RAM but they are adding cool new features.
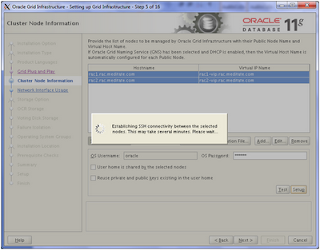
You will see the following and click Ok.
Then, Click ssh test and you will see the following and click ok.

When you click “Next” the installer will test the ssh connectivity, validate node readiness, user equivalence, etc. before going to the next step, interface setup.
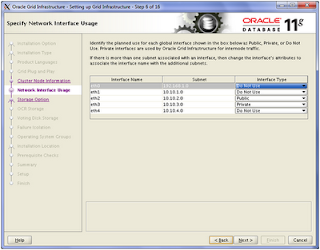
Our public is 10.10.2.0 and private is 10.10.3.0 and set all others to don't use. We should use the public ip as scan and vip ip's.
Here click next.
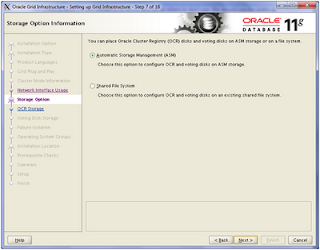
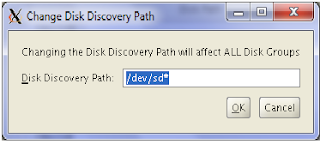
You will not see any luns here but just change the discovery path to /dev/sd* and you be able to see all the luns that we had created earlier.
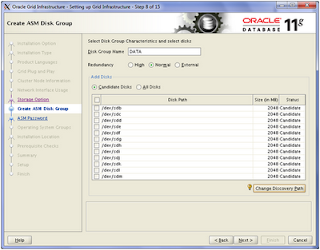
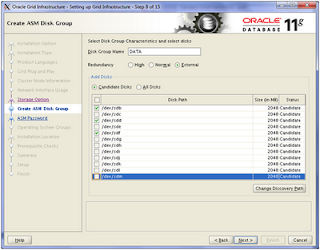
click external and I will have the disk group named as default and i.e. DATA1 and will pick 3 luns randomley, I picked just one lun at this point and will add luns later and click next.
I will use same password for simplicity.
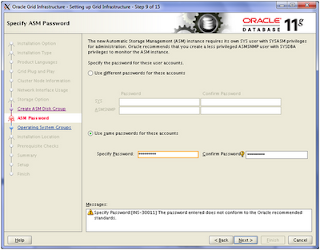
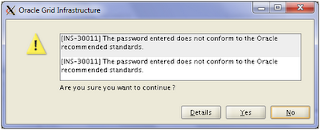
Click yes.
Click don't use intelligent platform.
Click Next and choose all as oinstall.
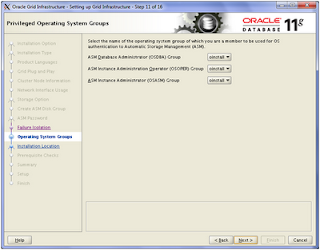
click yes.
Next change the Software location for Grid Home to /u02/app/11.2.0.1/grid. When you click “Next” the installer doesn’t jump to the next panel right away - be patient.
Click next on next screen where we need to pick inventory location as we will pick default.
and then it will run prechecks and you will see the following screen.
and then it will run prechecks and you will see the following screen.
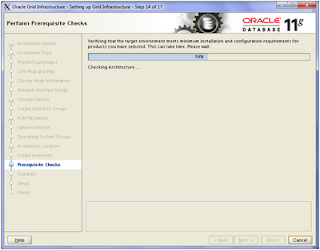
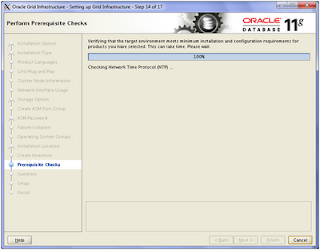
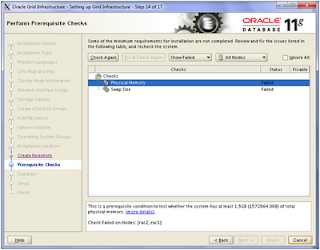
If you see it only fails at swap and physical memory then don't worry.
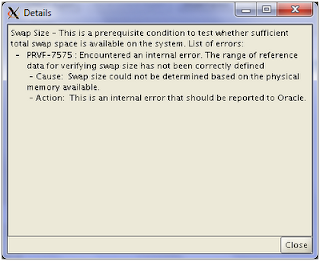
Details of swap error.
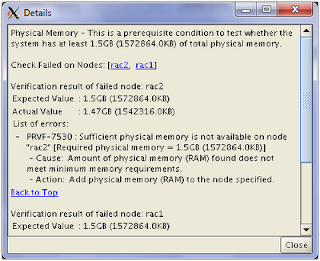
Details of physical memory erro. Its some bug just forget about it for now and continue.
On the next screen clcik finish. Depending on the RAM and CPU of your computer the speed of install will vary, be patient and if you are curious then do tail on the installer log to see whats happening behind the sceens.
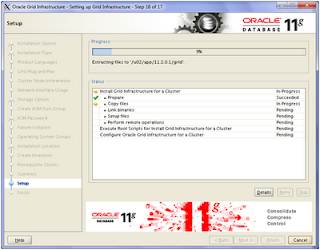

Now run these scripts. Logon to rac1 and ececute both the scripts one by one. First script is quick and the second script takes time. Be patient, second script also brings up ASM.
Once both the scripts are a success on rac1 then execute both the scripts on rac2. Remeber to accept all teh default values. Just hit enter key where it needs some input.
[root@rac1 ~]# /u01/app/oraInventory/orainstRoot.sh
Changing permissions of /u01/app/oraInventory.
Adding read,write permissions for group.
Removing read,write,execute permissions for world.
Changing groupname of /u01/app/oraInventory to oinstall.
The execution of the script is complete.
[root@rac1 ~]# /u02/app/11.2.0.1/grid/root.sh
Running Oracle 11g root.sh script...
The following environment variables are set as:
ORACLE_OWNER= oracle
ORACLE_HOME= /u02/app/11.2.0.1/grid
Enter the full pathname of the local bin directory: [/usr/local/bin]:
Copying dbhome to /usr/local/bin ...
Copying oraenv to /usr/local/bin ...
Copying coraenv to /usr/local/bin ...
Creating /etc/oratab file...
Entries will be added to the /etc/oratab file as needed by
Database Configuration Assistant when a database is created
Finished running generic part of root.sh script.
Now product-specific root actions will be performed.
2010-07-01 14:16:36: Parsing the host name
2010-07-01 14:16:36: Checking for super user privileges
2010-07-01 14:16:36: User has super user privileges
Using configuration parameter file: /u02/app/11.2.0.1/grid/crs/install/crsconfig_params
Creating trace directory
LOCAL ADD MODE
Creating OCR keys for user 'root', privgrp 'root'..
Operation successful.
root wallet
root wallet cert
root cert export
peer wallet
profile reader wallet
pa wallet
peer wallet keys
pa wallet keys
peer cert request
pa cert request
peer cert
pa cert
peer root cert TP
profile reader root cert TP
pa root cert TP
peer pa cert TP
pa peer cert TP
profile reader pa cert TP
profile reader peer cert TP
peer user cert
pa user cert
Adding daemon to inittab
CRS-4123: Oracle High Availability Services has been started.
ohasd is starting
CRS-2672: Attempting to start 'ora.gipcd' on 'rac1'
CRS-2672: Attempting to start 'ora.mdnsd' on 'rac1'
CRS-2676: Start of 'ora.mdnsd' on 'rac1' succeeded
CRS-2676: Start of 'ora.gipcd' on 'rac1' succeeded
CRS-2672: Attempting to start 'ora.gpnpd' on 'rac1'
CRS-2676: Start of 'ora.gpnpd' on 'rac1' succeeded
CRS-2672: Attempting to start 'ora.cssdmonitor' on 'rac1'
CRS-2676: Start of 'ora.cssdmonitor' on 'rac1' succeeded
CRS-2672: Attempting to start 'ora.cssd' on 'rac1'
CRS-2672: Attempting to start 'ora.diskmon' on 'rac1'
CRS-2676: Start of 'ora.diskmon' on 'rac1' succeeded
CRS-2676: Start of 'ora.cssd' on 'rac1' succeeded
CRS-2672: Attempting to start 'ora.ctssd' on 'rac1'
CRS-2676: Start of 'ora.ctssd' on 'rac1' succeeded
ASM created and started successfully.
DiskGroup DATA1 created successfully.
clscfg: -install mode specified
Successfully accumulated necessary OCR keys.
Creating OCR keys for user 'root', privgrp 'root'..
Operation successful.
CRS-2672: Attempting to start 'ora.crsd' on 'rac1'
CRS-2676: Start of 'ora.crsd' on 'rac1' succeeded
CRS-4256: Updating the profile
Successful addition of voting disk 44d575b60a4b4fb5bf3cf8b51d001778.
Successfully replaced voting disk group with +DATA1.
CRS-4256: Updating the profile
CRS-4266: Voting file(s) successfully replaced
## STATE File Universal Id File Name Disk group
-- ----- ----------------- --------- ---------
1. ONLINE 44d575b60a4b4fb5bf3cf8b51d001778 (/dev/sdc) [DATA1]
Located 1 voting disk(s).
CRS-2673: Attempting to stop 'ora.crsd' on 'rac1'
CRS-2677: Stop of 'ora.crsd' on 'rac1' succeeded
CRS-2673: Attempting to stop 'ora.asm' on 'rac1'
CRS-2677: Stop of 'ora.asm' on 'rac1' succeeded
CRS-2673: Attempting to stop 'ora.ctssd' on 'rac1'
CRS-2677: Stop of 'ora.ctssd' on 'rac1' succeeded
CRS-2673: Attempting to stop 'ora.cssdmonitor' on 'rac1'
CRS-2677: Stop of 'ora.cssdmonitor' on 'rac1' succeeded
CRS-2673: Attempting to stop 'ora.cssd' on 'rac1'
CRS-2677: Stop of 'ora.cssd' on 'rac1' succeeded
CRS-2673: Attempting to stop 'ora.gpnpd' on 'rac1'
CRS-2677: Stop of 'ora.gpnpd' on 'rac1' succeeded
CRS-2673: Attempting to stop 'ora.gipcd' on 'rac1'
CRS-2677: Stop of 'ora.gipcd' on 'rac1' succeeded
CRS-2673: Attempting to stop 'ora.mdnsd' on 'rac1'
CRS-2677: Stop of 'ora.mdnsd' on 'rac1' succeeded
CRS-2672: Attempting to start 'ora.mdnsd' on 'rac1'
CRS-2676: Start of 'ora.mdnsd' on 'rac1' succeeded
CRS-2672: Attempting to start 'ora.gipcd' on 'rac1'
CRS-2676: Start of 'ora.gipcd' on 'rac1' succeeded
CRS-2672: Attempting to start 'ora.gpnpd' on 'rac1'
CRS-2676: Start of 'ora.gpnpd' on 'rac1' succeeded
CRS-2672: Attempting to start 'ora.cssdmonitor' on 'rac1'
CRS-2676: Start of 'ora.cssdmonitor' on 'rac1' succeeded
CRS-2672: Attempting to start 'ora.cssd' on 'rac1'
CRS-2672: Attempting to start 'ora.diskmon' on 'rac1'
CRS-2676: Start of 'ora.diskmon' on 'rac1' succeeded
CRS-2676: Start of 'ora.cssd' on 'rac1' succeeded
CRS-2672: Attempting to start 'ora.ctssd' on 'rac1'
CRS-2676: Start of 'ora.ctssd' on 'rac1' succeeded
CRS-2672: Attempting to start 'ora.asm' on 'rac1'
CRS-2676: Start of 'ora.asm' on 'rac1' succeeded
CRS-2672: Attempting to start 'ora.crsd' on 'rac1'
CRS-2676: Start of 'ora.crsd' on 'rac1' succeeded
CRS-2672: Attempting to start 'ora.evmd' on 'rac1'
CRS-2676: Start of 'ora.evmd' on 'rac1' succeeded
CRS-2672: Attempting to start 'ora.asm' on 'rac1'
CRS-2676: Start of 'ora.asm' on 'rac1' succeeded
CRS-2672: Attempting to start 'ora.DATA1.dg' on 'rac1'
CRS-2676: Start of 'ora.DATA1.dg' on 'rac1' succeeded
CRS-2672: Attempting to start 'ora.registry.acfs' on 'rac1'
CRS-2676: Start of 'ora.registry.acfs' on 'rac1' succeeded
rac1 2010/07/01 14:23:43 /u02/app/11.2.0.1/grid/cdata/rac1/backup_20100701_142343.olr
Preparing packages for installation...
cvuqdisk-1.0.7-1
Configure Oracle Grid Infrastructure for a Cluster ... succeeded
Updating inventory properties for clusterware
Starting Oracle Universal Installer...
Checking swap space: must be greater than 500 MB. Actual 4349 MB Passed
The inventory pointer is located at /etc/oraInst.loc
The inventory is located at /u01/app/oraInventory
'UpdateNodeList' was successful.
[root@rac1 ~]#
On node 2:
[root@rac2 ~]# /u01/app/oraInventory/orainstRoot.sh
Changing permissions of /u01/app/oraInventory.
Adding read,write permissions for group.
Removing read,write,execute permissions for world.
Changing groupname of /u01/app/oraInventory to oinstall.
The execution of the script is complete.
[root@rac2 ~]# /u02/app/11.2.0.1/grid/root.sh
Running Oracle 11g root.sh script...
The following environment variables are set as:
ORACLE_OWNER= oracle
ORACLE_HOME= /u02/app/11.2.0.1/grid
Enter the full pathname of the local bin directory: [/usr/local/bin]:
Copying dbhome to /usr/local/bin ...
Copying oraenv to /usr/local/bin ...
Copying coraenv to /usr/local/bin ...
Creating /etc/oratab file...
Entries will be added to the /etc/oratab file as needed by
Database Configuration Assistant when a database is created
Finished running generic part of root.sh script.
Now product-specific root actions will be performed.
2010-07-01 14:24:58: Parsing the host name
2010-07-01 14:24:58: Checking for super user privileges
2010-07-01 14:24:58: User has super user privileges
Using configuration parameter file: /u02/app/11.2.0.1/grid/crs/install/crsconfig_params
Creating trace directory
LOCAL ADD MODE
Creating OCR keys for user 'root', privgrp 'root'..
Operation successful.
Adding daemon to inittab
CRS-4123: Oracle High Availability Services has been started.
ohasd is starting
CRS-4402: The CSS daemon was started in exclusive mode but found an active CSS daemon on node rac1, number 1, and is terminating
An active cluster was found during exclusive startup, restarting to join the cluster
CRS-2672: Attempting to start 'ora.mdnsd' on 'rac2'
CRS-2676: Start of 'ora.mdnsd' on 'rac2' succeeded
CRS-2672: Attempting to start 'ora.gipcd' on 'rac2'
CRS-2676: Start of 'ora.gipcd' on 'rac2' succeeded
CRS-2672: Attempting to start 'ora.gpnpd' on 'rac2'
CRS-2676: Start of 'ora.gpnpd' on 'rac2' succeeded
CRS-2672: Attempting to start 'ora.cssdmonitor' on 'rac2'
CRS-2676: Start of 'ora.cssdmonitor' on 'rac2' succeeded
CRS-2672: Attempting to start 'ora.cssd' on 'rac2'
CRS-2672: Attempting to start 'ora.diskmon' on 'rac2'
CRS-2676: Start of 'ora.diskmon' on 'rac2' succeeded
CRS-2676: Start of 'ora.cssd' on 'rac2' succeeded
CRS-2672: Attempting to start 'ora.ctssd' on 'rac2'
CRS-2676: Start of 'ora.ctssd' on 'rac2' succeeded
CRS-2672: Attempting to start 'ora.drivers.acfs' on 'rac2'
CRS-2676: Start of 'ora.drivers.acfs' on 'rac2' succeeded
CRS-2672: Attempting to start 'ora.asm' on 'rac2'
CRS-2676: Start of 'ora.asm' on 'rac2' succeeded
CRS-2672: Attempting to start 'ora.crsd' on 'rac2'
CRS-2676: Start of 'ora.crsd' on 'rac2' succeeded
CRS-2672: Attempting to start 'ora.evmd' on 'rac2'
CRS-2676: Start of 'ora.evmd' on 'rac2' succeeded
rac2 2010/07/01 14:28:34 /u02/app/11.2.0.1/grid/cdata/rac2/backup_20100701_142834.olr
Preparing packages for installation...
cvuqdisk-1.0.7-1
Configure Oracle Grid Infrastructure for a Cluster ... succeeded
Updating inventory properties for clusterware
Starting Oracle Universal Installer...
Checking swap space: must be greater than 500 MB. Actual 5023 MB Passed
The inventory pointer is located at /etc/oraInst.loc
The inventory is located at /u01/app/oraInventory
'UpdateNodeList' was successful.
[root@rac2 ~]#
Then comeback and click ok on root.sh screen and the post install will continue.
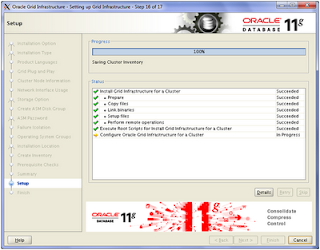
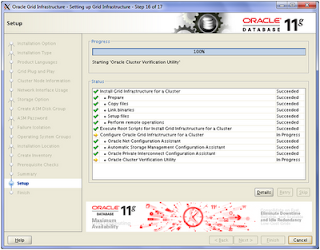

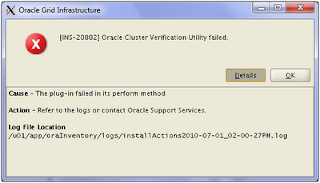
Click Ok on teh above screens as cluster is up and running, you can check that with the following commands:
[oracle@rac1 bin]$ ./olsnodes
rac1
rac2
[oracle@rac1 bin]$
[oracle@rac2 bin]$ ./olsnodes
rac1
rac2
[oracle@rac2 bin]$
and then close the installer after that on teh following screen.
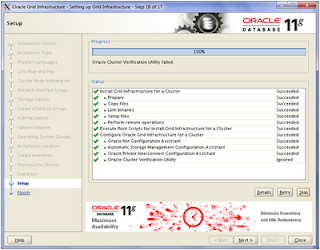
At this point Grid infrastructure is all installed and we are ready to install the database software. But
here I would like to setup profile command to set the environment
Add the following line to the end of /etc/oratab on both the nodes:
crs:/u02/app/11.2.0.1/grid:N
Execute the following commands on both the nodes
mkdir -p /u01/app/oracle/dbm/ora_rac
mkdir -p ${HOME}/dbasetup
cd ${HOME}/dbasetup
touch dbaalias
Change directory to home directory by executing "cd" and
replace the contents of .bash_profile with the following:
#############################################################
# ============================== RAC Environment Settings ================================
# ----- Set the default ORA_CRS_HOME, ORACLE_BASE and ORACLE_HOME values -----
export ORACLE_BASE=/u01/app/oracle
export ORACLE_HOME= /u01/app/oracle/product/11.2.0.1/dbhome_1
export ORA_CRS_HOME=/u02/app/11.2.0.1/grid
export CRS_HOME=${ORA_CRS_HOME}
export NLS_LANG=AMERICAN_AMERICA.AL32UTF8
# Default path settings.
export export PATH=/usr/local/bin:/sbin:/usr/sbin:$PATH:${ORACLE_BASE}/dbm/ora_rac:.
# Reference commands only:
# export SRVM_TRACE=true ; # only when server control trace is required
# export PATH=${ORACLE_HOME}/Opatch:${PATH} ; # only during patches
# ============================ End of RAC Environment Settings ================================
# Default oracle environment settings.
export ORACLE_SID=crs
export ORAENV_ASK=NO
#--- comment out the following line before the first oracle install ---
#. /usr/local/bin/oraenv
export ORAENV_ASK=YES
# Default editor.
export EDITOR=vi
# Character settings for reflections.
if tty -s
then
stty intr ^C
stty kill ^U
stty erase ^H
set -o vi
fi
# History will list last 200 commands issued.
history=200
# Default file creation mask
umask 0022
# Set platform-specific variables
UNIXNAME=`uname -a awk '{ print $1 }' `
case $UNIXNAME in
AIX)
export TNS_ADMIN=/etc
export AIXTHREAD_SCOPE=S
ulimit -m 2045680
;;
Linux)
export TNS_ADMIN=/etc/
;;
SunOS)
export TNS_ADMIN=/var/opt/oracle
;;
esac
# Set the hostname.
HOST=`hostname`
# Set the 2 line prompt.
PS1='
'`whoami`' : ${HOST} : @${ORACLE_SID} : $PWD
\$ '
# Call the dba alias for all other aliases and such required for dba productivity.
. ${HOME}/dbasetup/dbaalias
From node 1:
oracle : rac1.rac.meditate.com : @crs : /home/oracle
$ crs_stat -t -v
Name Type R/RA F/FT Target State Host
----------------------------------------------------------------------
ora.DATA1.dg ora....up.type 0/5 0/ ONLINE ONLINE rac1
ora....ER.lsnr ora....er.type 0/5 0/ ONLINE ONLINE rac1
ora....N1.lsnr ora....er.type 0/5 0/0 ONLINE ONLINE rac1
ora.asm ora.asm.type 0/5 0/ ONLINE ONLINE rac1
ora.eons ora.eons.type 0/3 0/ ONLINE ONLINE rac1
ora.gsd ora.gsd.type 0/5 0/ OFFLINE OFFLINE
ora....network ora....rk.type 0/5 0/ ONLINE ONLINE rac1
ora.oc4j ora.oc4j.type 0/5 0/0 OFFLINE OFFLINE
ora.ons ora.ons.type 0/3 0/ ONLINE ONLINE rac1
ora....SM1.asm application 0/5 0/0 ONLINE ONLINE rac1
ora....C1.lsnr application 0/5 0/0 ONLINE ONLINE rac1
ora.rac1.gsd application 0/5 0/0 OFFLINE OFFLINE
ora.rac1.ons application 0/3 0/0 ONLINE ONLINE rac1
ora.rac1.vip ora....t1.type 0/0 0/0 ONLINE ONLINE rac1
ora....SM2.asm application 0/5 0/0 ONLINE ONLINE rac2
ora....C2.lsnr application 0/5 0/0 ONLINE ONLINE rac2
ora.rac2.gsd application 0/5 0/0 OFFLINE OFFLINE
ora.rac2.ons application 0/3 0/0 ONLINE ONLINE rac2
ora.rac2.vip ora....t1.type 0/0 0/0 ONLINE ONLINE rac2
ora....ry.acfs ora....fs.type 0/5 0/ ONLINE ONLINE rac1
ora.scan1.vip ora....ip.type 0/0 0/0 ONLINE ONLINE rac1
oracle : rac1.rac.meditate.com : @crs : /home/oracle
$
1.1 Enable GSD
The Global Services Daemon (GSD) was started automatically with previous versions of Oracle but after the install, you’ll find the “gsd” processes offline. These processes are stated by Oracle documentation as coordinating requests between the cluster manager and other processes. It’s actually possible that this is enabled after you create your first database. If not, enable it like so:
From node 1 execute following:
srvctl enable nodeapps
srvctl start nodeapps
oracle : rac1.rac.meditate.com : @crs : /home/oracle
$ srvctl enable nodeapps
PRKO-2415 : VIP is already enabled on node(s): rac1,rac2
PRKO-2416 : Network resource is already enabled.
PRKO-2417 : ONS is already enabled on node(s): rac1,rac2
PRKO-2418 : eONS is already enabled on node(s): rac1,rac2
oracle : rac1.rac.meditate.com : @crs : /home/oracle
$ srvctl start nodeapps
PRKO-2421 : Network resource is already started on node(s): rac1,rac2
PRKO-2420 : VIP is already started on node(s): rac1,rac2
PRKO-2420 : VIP is already started on node(s): rac1,rac2
PRKO-2422 : ONS is already started on node(s): rac1,rac2
PRKO-2423 : eONS is already started on node(s): rac1,rac2
oracle : rac1.rac.meditate.com : @crs : /home/oracle
$ crs_stat -t -v
Name Type R/RA F/FT Target State Host
----------------------------------------------------------------------
ora.DATA1.dg ora....up.type 0/5 0/ ONLINE ONLINE rac1
ora....ER.lsnr ora....er.type 0/5 0/ ONLINE ONLINE rac1
ora....N1.lsnr ora....er.type 0/5 0/0 ONLINE ONLINE rac1
ora.asm ora.asm.type 0/5 0/ ONLINE ONLINE rac1
ora.eons ora.eons.type 0/3 0/ ONLINE ONLINE rac1
ora.gsd ora.gsd.type 0/5 0/ ONLINE ONLINE rac1
ora....network ora....rk.type 0/5 0/ ONLINE ONLINE rac1
ora.oc4j ora.oc4j.type 0/5 0/0 OFFLINE OFFLINE
ora.ons ora.ons.type 0/3 0/ ONLINE ONLINE rac1
ora....SM1.asm application 0/5 0/0 ONLINE ONLINE rac1
ora....C1.lsnr application 0/5 0/0 ONLINE ONLINE rac1
ora.rac1.gsd application 0/5 0/0 ONLINE ONLINE rac1
ora.rac1.ons application 0/3 0/0 ONLINE ONLINE rac1
ora.rac1.vip ora....t1.type 0/0 0/0 ONLINE ONLINE rac1
ora....SM2.asm application 0/5 0/0 ONLINE ONLINE rac2
ora....C2.lsnr application 0/5 0/0 ONLINE ONLINE rac2
ora.rac2.gsd application 0/5 0/0 ONLINE ONLINE rac2
ora.rac2.ons application 0/3 0/0 ONLINE ONLINE rac2
ora.rac2.vip ora....t1.type 0/0 0/0 ONLINE ONLINE rac2
ora....ry.acfs ora....fs.type 0/5 0/ ONLINE ONLINE rac1
ora.scan1.vip ora....ip.type 0/0 0/0 ONLINE ONLINE rac1
oracle : rac1.rac.meditate.com : @crs : /home/oracle
$
For now I will remove oc4j, if you need it later its easy to add it.
From node 1 execute:
srvctl remove oc4j
There’s no output from this command, so nothing to show in a sample output.
oracle : rac1.rac.meditate.com : @crs : /home/oracle
$ crs_stat -t -v
Name Type R/RA F/FT Target State Host
----------------------------------------------------------------------
ora.DATA1.dg ora....up.type 0/5 0/ ONLINE ONLINE rac1
ora....ER.lsnr ora....er.type 0/5 0/ ONLINE ONLINE rac1
ora....N1.lsnr ora....er.type 0/5 0/0 ONLINE ONLINE rac1
ora.asm ora.asm.type 0/5 0/ ONLINE ONLINE rac1
ora.eons ora.eons.type 0/3 0/ ONLINE ONLINE rac1
ora.gsd ora.gsd.type 0/5 0/ ONLINE ONLINE rac1
ora....network ora....rk.type 0/5 0/ ONLINE ONLINE rac1
ora.ons ora.ons.type 0/3 0/ ONLINE ONLINE rac1
ora....SM1.asm application 0/5 0/0 ONLINE ONLINE rac1
ora....C1.lsnr application 0/5 0/0 ONLINE ONLINE rac1
ora.rac1.gsd application 0/5 0/0 ONLINE ONLINE rac1
ora.rac1.ons application 0/3 0/0 ONLINE ONLINE rac1
ora.rac1.vip ora....t1.type 0/0 0/0 ONLINE ONLINE rac1
ora....SM2.asm application 0/5 0/0 ONLINE ONLINE rac2
ora....C2.lsnr application 0/5 0/0 ONLINE ONLINE rac2
ora.rac2.gsd application 0/5 0/0 ONLINE ONLINE rac2
ora.rac2.ons application 0/3 0/0 ONLINE ONLINE rac2
ora.rac2.vip ora....t1.type 0/0 0/0 ONLINE ONLINE rac2
ora....ry.acfs ora....fs.type 0/5 0/ ONLINE ONLINE rac1
ora.scan1.vip ora....ip.type 0/0 0/0 ONLINE ONLINE rac1
Now I will stop all the machines and take the backup of them and restart them all and then I will run asmca to add new diskgroup and more disks to DATA1 and then will install the database software.
Remember:
Cherish in your consciousness the One who created you as He alone shall go along with you
Part 1 - Vmware Setup
Part 2 - Setup Base Brick Machine
Part 3 - SAN Setup
Part 4 - RAC VM Setup
Part 5 - Install Grid Infrastructure
Part 6 - Run asmca and Install RDBMS Software
Part 7 - Create RAC database with DBCA
Part 8 - Add node and instance to existing 11gR2 Cluster db
Part 9 - Delete node and inst from existing 11gR2 cluster db




This comment has been removed by the author.
ReplyDeleteHello Buyer
ReplyDeleteThanks !!!!!!
Just two steps above the command that you mentioned I have following:
"Now login to rac1 as oracle from putty and unzip the grid file as, following are the screenshots that
show you how to open a putty window that has X11 forward enabled. I had explained it in the last part also
but here I am explaining agin with screen shots."
SCREENSHOT:
"Open the putty window and click on ssh under connection and click X11 and then check enable X11
forwarding and login. I am logging in as oracle as we will install Grid infrastructure now."
SCREENSHOT
Then click on "session" on left hand side of this window and put in the ip address of the server you are
connecting to and click open.
Then login as oracle to this machine from this putty window where you changed the X11 settings:
and then just start the Xming and that it :)
I hope that will help. If you have any question regarding blog, just post a comment.
Regards
Gurpartap Singh
This comment has been removed by the author.
ReplyDeleteGurpratap - never mind , i have deleted the current vm and restored from backup its working now..
ReplyDeleteThanks
Great...Nice to hear it working now. Have fun !
ReplyDeleteOn installing GRID after SSH succesful connection on the next screen I got this error
ReplyDelete"[INS-40912]Virtual host name:rac1-vip.test.com is assigned to another system on the network."
The host name rac1-vip is not assigned to any machine on my network except the rac VM I am trying to install Grid.
Sorry for the late reply Tad, I was away on vacations. I hope you would have passed this step by now. If not then let me know, I would try to help.
ReplyDeleteRegards
Gurpartap Singh
Hello Gurpartap,
ReplyDeleteWhile installing grid ..at the step where ASM disk group need to be selected was not showing up for me
I have tried with disk string with /dev/sd* and external.
Did i miss any thing ?
Thank you,
Kc
Hello KC,
ReplyDeleteI think you missed something, as if all the steps are followed these steps work fine.
Do you have iscsi daemon running and also are you able to see the luns on both machines with following command?
/dev/sd*
Regards
Gurpartap Singh
Yes I am able to access the luns from both machines ..i mean RAC1 & RAC2.
ReplyDeleteI have to check iscsi deamon running or not will update you in the evening.
But today morning when i tried i was able to see one disk which is /dev/random which is not our luns though ...
Thank you,
Kc.
What you get if you try the following steps on both the machines? Are you able to get correct results as written below:
ReplyDeleteNow discover the luns with the following command:
iscsiadm -m discovery -t sendtargets -p san.rac.meditate.com
and you should see:
10.10.1.175:3260,1 iqm.mgmt.volumes-san
You should also be able to see the devices using
"fdisk -l" and
ls -l /dev/sd*
Note - sdb to sdm are the iscsi disks and if you don't see them reboot the machine and try discovery again and you should be able to see these luns.
Execute following as root so that iscsi service starts on every reboot.
chkconfig --level 345 iscsi on
With the following command change the permissions of the devices to oracle and oinstall:
Though we have more devices but we have activated just 12 of them in SAN, if you want you can add them now or you can add them later. I will not add them now.
chown oracle:oinstall /dev/sd[b-m]
Also add this line to the end of the file /etc/rc.d/rc.local
chown oracle:oinstall /dev/sd[b-m]
Hey Gurpartap,
ReplyDeleteIts all working now ... its my mistake missed couple of steps. While Installing Grid at the preinstallation checks .. Mine was failed at NTS (network time protocal). I have added the servers IP's in conf it cleared.
Thank you for all the details and your quick response is much appreciated.
Kc.
Hello KC,
ReplyDeleteGood to know it worked for you, have fun !
Regards
Gurpartap Singh
Hi Gurpartap,
ReplyDeleteNice tutorial... im having same issues like Tad's above
I got this error
"[INS-40912]Virtual host name:rac1-vip.test.com is assigned to another system on the network."
The host name rac1-vip is not assigned to any machine on my network
What did i do wrong :S
Hello Gurpartap Singh Ji,
ReplyDeleteWhen i run runInstaller, i get display variable error. I tried to set the display variable with different values, but it did not work. any help?
Please do all the steps as given in blog. Is it still a problem.
ReplyDeleteRegards
Gurpartap Singh
i got this warning due to perform prerequisite check
ReplyDeleteDevice Checks for ASM - This is a pre-check to verify if the specified devices meet the requirements for configuration through the Oracle Universal Storage Manager Configuration Assistant.
Check Failed on Nodes: [rac2, rac1]
Verification result of failed node: rac2
Details:
-
PRVF-5184 : Check of following Udev attributes of "rac2:/dev/sdb" failed: "[Owner: Found='root' Expected='oracle', Group: Found='root' Expected='oinstall', Permissions: Found='0600' Expected='0660']" - Cause: Found incorrect attributes for the specified device. - Action: Ensure that the device attributes are set correctly. See Configurable Dynamic Device Naming documentation (udev) for further information.
-
PRVF-5184 : Check of following Udev attributes of "rac2:/dev/sde" failed: "[Owner: Found='root' Expected='oracle', Group: Found='root' Expected='oinstall', Permissions: Found='0600' Expected='0660']" - Cause: Found incorrect attributes for the specified device. - Action: Ensure that the device attributes are set correctly. See Configurable Dynamic Device Naming documentation (udev) for further information.
-
PRVF-5184 : Check of following Udev attributes of "rac2:/dev/sdd" failed: "[Owner: Found='root' Expected='oracle', Group: Found='root' Expected='oinstall', Permissions: Found='0600' Expected='0660']" - Cause: Found incorrect attributes for the specified device. - Action: Ensure that the device attributes are set correctly. See Configurable Dynamic Device Naming documentation (udev) for further information.
Back to Top
Verification result of failed node: rac1
Details:
-
PRVF-5184 : Check of following Udev attributes of "rac1:/dev/sdb" failed: "[Owner: Found='root' Expected='oracle', Group: Found='root' Expected='oinstall', Permissions: Found='0600' Expected='0660']" - Cause: Found incorrect attributes for the specified device. - Action: Ensure that the device attributes are set correctly. See Configurable Dynamic Device Naming documentation (udev) for further information.
-
PRVF-5184 : Check of following Udev attributes of "rac1:/dev/sde" failed: "[Owner: Found='root' Expected='oracle', Group: Found='root' Expected='oinstall', Permissions: Found='0600' Expected='0660']" - Cause: Found incorrect attributes for the specified device. - Action: Ensure that the device attributes are set correctly. See Configurable Dynamic Device Naming documentation (udev) for further information.
-
PRVF-5184 : Check of following Udev attributes of "rac1:/dev/sdd" failed: "[Owner: Found='root' Expected='oracle', Group: Found='root' Expected='oinstall', Permissions: Found='0600' Expected='0660']" - Cause: Found incorrect attributes for the specified device. - Action: Ensure that the device attributes are set correctly. See Configurable Dynamic Device Naming documentation (udev) for further information.
Back to Top
help me please
is that copy paste information lol
ReplyDeletesee this link lol
http://hussamtawfeq.blogspot.in/search?updated-min=2011-01-01T00:00:00-08:00&updated-max=2012-01-01T00:00:00-08:00&max-results=2
Hello David,
ReplyDeleteThanks for visiting my blog.
Thanks for pointing out. Someone copied everything from my blog :)
Thats ok though, as I have created for knowledge sharing.
Regards,
Gurpartap Singh
Thanks for visiting my blog Moamen Mohammed !
ReplyDeleteSorry for the late reply as I was on vacations. Hopefully you have recovered from this error by now. Looks like some permission problems with luns.
Regards,
Gurpartap Singh